
A portfolio is a collection of projects. It is also an excellent way to show your work to clients and prospects. HoneyPress Pro provides a filterable project feature. This means that you can categorize the projects and allow the users to filter their view according to these categories. You can also choose the layout that best fits your requirements and that you find most appealing between three types of Portfolio templates: 2 columns, 3 columns, and 4 columns.

To create a portfolio, follow the below steps:
1. Create a Project Category (if you want to take advantage of the filtering features)
To create the categorized portfolio, you need to start by creating the project categories. These will display as filter tabs and allow the viewers to see the projects filtered by specific categories.
To do this, Go to the Projects tab and click on Project categories. Here you will be able to add categories with which can filter the projects (i.e. graphics, photography, fashion, web design, and so on). Enter a Name of your choice for the category and click on Add New Category button.

2. Create a Project
Now you can add projects and assign a different category to each of the projects. In the wp-admin panel, click on the Projects tab then click on Add new button.

- Name: Add here the name for your project.
- Link: Add a link to the project from here.
- Open link in a new tab: Select this option if you want to open the link in a new tab.
- Project Categories: Now assign a category or categories to the project.
- Featured Image: Set a featured image of your choice.
- Publish the project.
3. Portfolio Settings
To manage portfolio settings, Go to Appearance >> Customize >> Homepage section settings >> Portfolio settings

- Enable / Disable Portfolio on Home Page: Hide/Show Portfolio section on the Homepage.
- Title: Add a title for the Portfolio section.
- Sub title: Add a subtitle for the Portfolio section.
- Design Style: Choose the portfolio section design style from here.
- Navigation Style: Select the navigation style for the portfolios. You can select either bullets, navigation, or both.
There are various design styles in the portfolio section. You can choose anyone that suits best on your site.
Design 1

Design 2

Design 3

Design 4

4. Adding specific project category to the menu
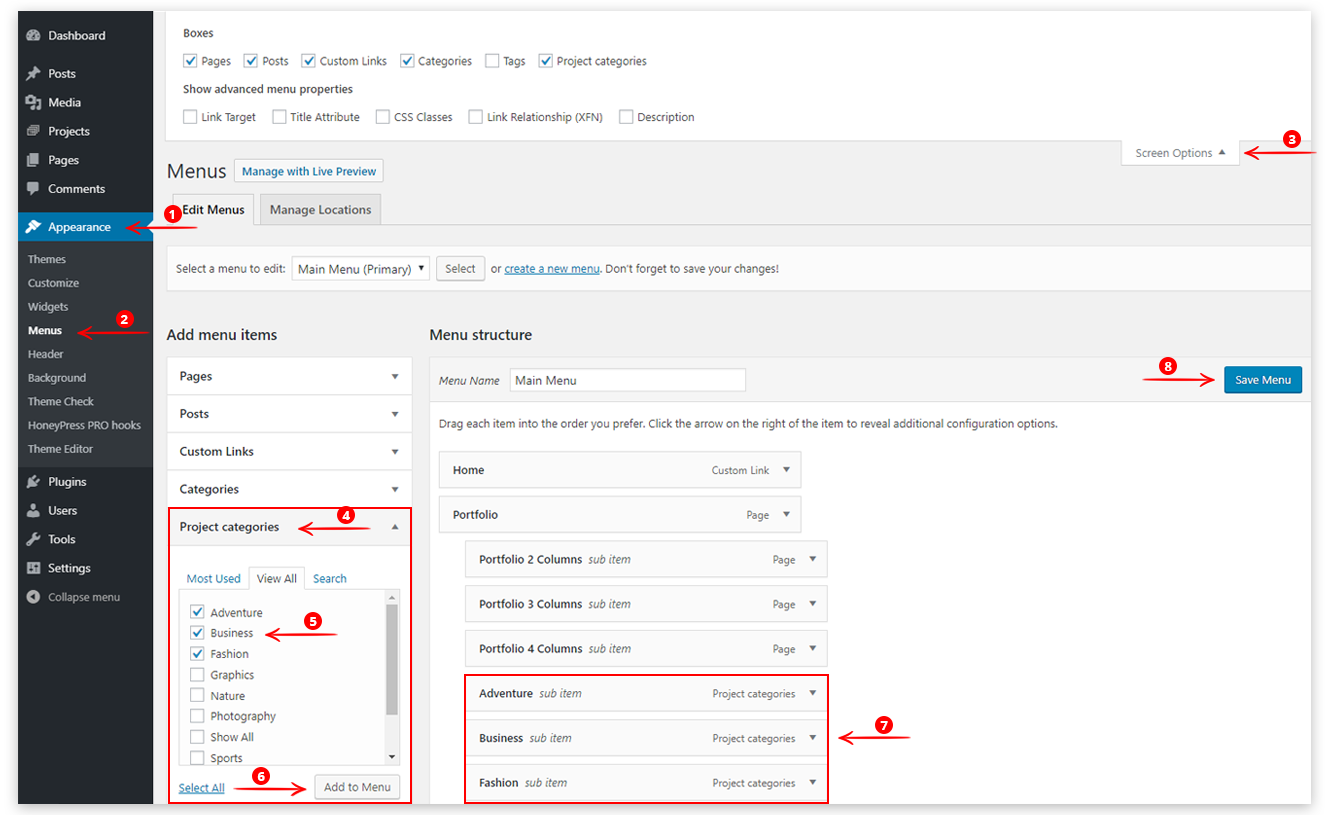
- To add a project category to the menu, Go to Appearance >> Menus
- Click on the Screen Options tab to see the Project categories checkbox, you need to enable this checkbox to show the Project Categories.
- You will now see a list of the Project categories you have created.
- Select one or more categories you want to add to the menu.
- Click on the Add to Menu button.
- Arrange these categories anywhere on the menu by drag and drop.
- Click on the Save Menu button before leaving the screen to apply the changes.
After set up a portfolio section, you can go to set up a Testimonial section.